Paper jams are the number one hardware complaint about printers — and they seem to happen at the worst possible moments. Whether it's a single sheet wedged in the feed rollers or a crumpled mess deep in the fuser unit, clearing a paper jam safely and thoroughly is a skill every printer owner should have.
This guide walks you through the process step by step, covers how to find hidden jams you might miss, and explains how to prevent jams from occurring in the future.
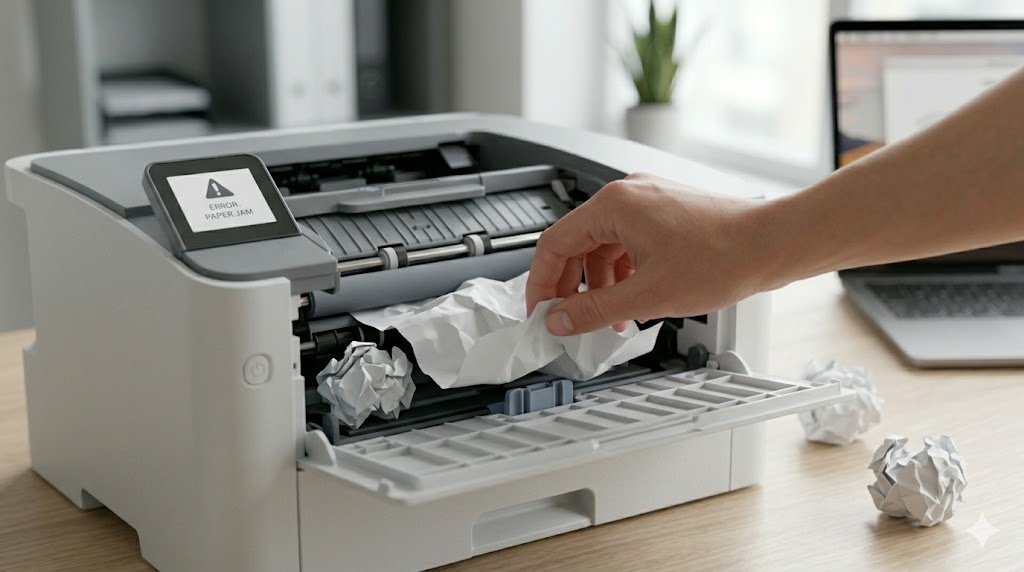
Before You Begin: Important Safety Steps
- Power off the printer and unplug it from the power outlet
- Gather a flashlight to help spot paper fragments in dark areas
- Have a small trash bin nearby for torn paper pieces
- Never use scissors, tweezers, or sharp objects inside the printer — they can damage rollers and sensors
Step 1: Identify Where the Jam Is
Most printers display a diagram or message indicating where the jam is located. Common jam locations include:
- Input tray / feed area: Paper stuck at the bottom where it enters the printer
- Inside the printer body: Paper jammed around the rollers or drum
- Output tray / exit area: Paper partially exited but stuck near the rollers
- Duplex unit: On printers with two-sided printing, paper can jam in the duplex path at the back or bottom
Step 2: Remove Paper From the Input Tray
Pull out the paper tray completely. Look for any paper that's partially fed or crumpled at the entry point. Gently pull the paper out in the direction of the paper path (usually straight forward or downward). Do not pull against the paper's natural direction — this can tear it and leave pieces inside.
If the paper tears and pieces remain inside, do not proceed with printing. All fragments must be removed first.
Step 3: Clear the Main Interior
Open all access doors — front cover, rear access panel (many printers have a removable rear door specifically for clearing jams), and if present, the duplex unit. Shine a flashlight inside and look for paper, including small torn pieces.
Gently pull any visible paper out in the direction of the paper path. If paper is under a roller, rotate the roller by hand in the forward direction while pulling the paper to help feed it free.
Step 4: Check the Output Area
Look at the paper exit slot and output tray. If paper is partially ejected but stuck, grip it firmly with both hands and pull it straight out in the direction it would normally exit. Using two hands evenly distributes the force and prevents tearing.
Step 5: Check the Rear Access Panel
Many jams — especially in the fuser area of laser printers — are only accessible from the back. Remove the rear panel (usually a simple tab or button release) and look for paper deep inside. This area can be hot on laser printers, so verify the printer has cooled before reaching in.
Step 6: Remove All Paper Fragments
This is the most important step that people skip. Even a tiny piece of paper left inside will trigger a jam error again on the next print job. Use a flashlight and look carefully at every area you accessed. Rotate the rollers by hand and watch for any fragment that appears.
Step 7: Reload Paper and Test
Once you're confident all paper and fragments are removed, reload paper into the input tray. Make sure the stack is aligned and within the tray's capacity limits. Power on the printer, let it run its startup routine, and print a test page.
Common Causes of Repeated Paper Jams
- Wrong paper type or size: Using paper that's too thin, too thick, damp, or wrinkled causes frequent jams
- Overfilled tray: Exceeding the paper tray's maximum capacity prevents smooth feeding
- Worn feed rollers: Rollers wear out over time and lose their grip. They may need cleaning or replacement
- Mixed paper sizes: Never load different paper sizes in the same tray at the same time
- Curled or damaged paper: Store paper flat in a dry place. Humidity causes paper to warp and jam easily
- Staples or paper clips left on pages: These damage rollers and cause jams
How to Prevent Paper Jams
- Fan the paper before loading to separate sheets and reduce static
- Don't overfill the tray — stay 10–15% below the maximum line
- Use good quality paper rated for your printer type (inkjet vs laser)
- Clean the feed rollers every 3–6 months with a lint-free cloth and water
- Store paper in its original sealed packaging until use to prevent moisture absorption
- Run the printer's cleaning utility regularly
When Paper Jams Won't Stop
If your printer jams with almost every print job despite correct paper loading, the feed rollers are likely worn out. Roller replacement kits are available for most popular printer models and are generally inexpensive (under $20). Alternatively, a printer service center can replace them professionally.